Linearity devation
Absolute value of the maximum deviation of a torque transducer’s characteristic curvedetermined with increasing load from the reference straight line which approximates the characteristic curve as a straight line. The specified value is expressed as a percentage of the sensitivity C.
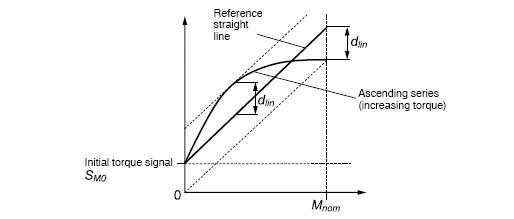
For determining the linearity deviation, a series of measurements is taken with the load increasing from zero to the nominal torque. The reference straight line is the best-fit straight line through the initial point, such that the maximum deviations (upward/downward) from the measurement signal have the same amount (see Fig. 3). The specified linearity deviation is the maximum deviation of the actual output signal from the reference straight line. It can also be described as half the width of the tolerance band that is symmetrical about the reference straight line.
The linearity deviation has to be taken into consideration because usually when adjusting the measurement chain, a characteristic curve in the form of a straight line is assumed. It takes maximum effect when a transducer is used for a wide measuring range, in the most extreme case from zero torque up to nominal torque.

Fig. 3: Determination of the linearity deviation
Linearity deviation including hysteresis
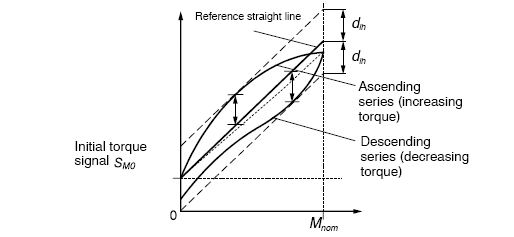
The linearity deviation including hysteresis specifies the maximum deviation (according to absolute value) of the output signal value from the reference straight line. The reference straight line is the best-fit straight line through the starting point (see Fig. 5). Thus, both linearity deviation and hysteresis are taken into consideration. The specified value is expressed as a percentage of the sensitivity C.
The load cycle for determining the linearity deviation including hysteresis covers the loading of the transducer from zero up to nominal torque and the subsequent relieving down to zero torque (see Fig. 5).
The reference straight line is the best-fit straight line through the initial point, such that the maximum deviations (upward/downward) from the measurement signal have the same amount.

Fig. 5 Determination of the linearity deviation including hysteresis dlh from a load-relieve cycle
The linearity deviation including hysteresis can also be interpreted as half the width of the tolerance band that is symmetrical about the reference straight line (see Fig. 5). The only difference to the procedure for the determination of the linearity deviation dlin is that the load cycle here includes also the measurements at decreasing torque. This difference takes effect on both the calculation of the reference straight line and the deviations from the reference straight line.
To determine this value, HBM proceeds as described below:
- The transducer is preloaded with counterclockwise torque in three load cycles from zero to 100 % of the nominal torque and back to zero torque. The purpose of thispreloading is to eliminate the influence of mounting like settling of bolts and smoothing of contact surfaces
- One load cycle with counterclockwise torque and recording of the respective values for the measurement signal at the predefined load steps (when testing during production at HBM these steps are at torque 0 %, 50 %, 100 %, 50 % and 0 % of Mnom)
- The transducer is preloaded with clockwise torque in three load cycles from zero to 100 % of the nominal torque and back to zero torque
- One load cycle with clockwise torque and recording of the respective values for the measurement signal at the predefined torque steps
- The best-fit straight line is calculated according to the above definition, separately for clockwise torque and counterclockwise torque
- The amount of the maximum deviation from the best-fit straight line is determined separately for clockwise torque and counterclockwise torque
The linearity deviation including hysteresis is of importance because normally when adjusting the measurement chain, a characteristic curve in the form of a straight line is assumed. It takes maximum effect if a transducer is used for a wide measuring range and it is not relieved between two relevant measurements. The most extreme case is the use from zero torque up to nominal torque.
Example:
Consider a T10FS torque flange of which the maximum permissible linearity deviation including hysteresis is specified as dlh ≤ 0.05 % and the nominal sensitivity amounts to 5 kHz. Provided that the measurement chain has been adjusted optimally, the output signal error due to the linearity deviation and hysteresis may amount to 2.5 Hz at most.


